備忘録:WordPressでRSSフィードをカスタマイズする方法

画像:http://girlydrop.com/girls/1315
こんにちは!みぞれ(@xxmiz0rexx)です。
WordPressが吐き出すデフォルトのRSSではSmart Newsなどのサービスできちんと表示できない場合があるようで、
自分で少しカスタマイズする必要があったので具体的に何をしたのかメモを残しておきます。
Smart Newsに限らず、WordPressのRSSをカスタマイズしたい人には参考になると思います。
やること
1.テーマディレクトリにRSSテンプレートを作る
まずはRSSのテンプレートファイルを作っていきます。
とは言え、一から作るのは大変なのでWordPress内にデフォルトで入っているテンプレートをカスタマイズしていきましょう!
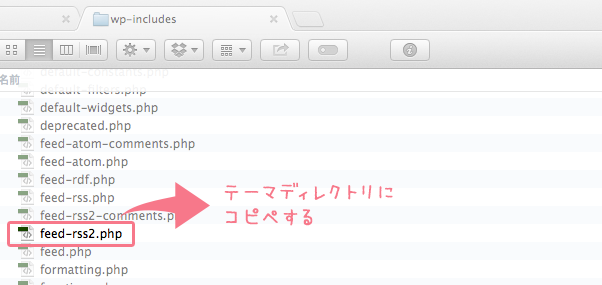
WordPressのwp-includesフォルダ内に『feed-rss2.php』というファイルがあるので
コピーし、現在使用しているテーマディレクトリにペーストしてください。
↑目次へ
2.functions.phpでRSSテンプレートを指定する
デフォルトのままだとwp-includes内のRSSテンプレートを見に行ってしまうので
先ほどコピーしたものを指定します。
functions.php
//RSSをテーマ内から読み込む
remove_filter('do_feed_rss2', 'do_feed_rss2', 10);
function custom_feed_rss2(){
$template_file = '/feed-rss2.php';
load_template(get_template_directory() . $template_file);
}
add_action('do_feed_rss2', 'custom_feed_rss2', 10);
↑目次へ
3.RSSの中身をカスタマイズする
今回はSmart Newsなどのサービスでちゃんと表示されるために
設定しておいたほうが良い項目を追記します。
①rss要素の開始タグに追記
まずは<rss>要素の開始タグにMedia RSS用のURLを追記しましょう。
テンプレートだと25行目あたりにあると思います。
feed-rss2.php
<rss version="2.0"
	xmlns:content="http://purl.org/rss/1.0/modules/content/"
	xmlns:wfw="http://wellformedweb.org/CommentAPI/"
	xmlns:dc="http://purl.org/dc/elements/1.1/"
	xmlns:atom="http://www.w3.org/2005/Atom"
	xmlns:sy="http://purl.org/rss/1.0/modules/syndication/"
	xmlns:slash="http://purl.org/rss/1.0/modules/slash/"
	xmlns:media="http://search.yahoo.com/mrss/"
	<?php
	/**
	 * Fires at the end of the RSS root to add namespaces.
	 *
	 * @since 2.0.0
	 */
	do_action( 'rss2_ns' );
	?>
>
ちなみにこれを書かないで後述する③を追記してしまうと以下のようなエラーが出てしまいます。
This page contains the following errors:
error on line 33 at column 21: Namespace prefix media on thumbnail is not defined
Below is a rendering of the page up to the first error.
参考:media:thumbnailでMedia RSSにサムネイル画像を表示させる方法
↑目次へ
②コピーライト・ロゴURLの設定
次に、<channel>要素下に提供者のコピーライトとサイトを象徴するロゴ画像(512 x 512 px)のURLを追記します。
feed-rss2.php
<channel>
<copyright>Copyright <?php echo date("Y"); ?> © <?php bloginfo_rss('name'); wp_title_rss(); ?> All rights reserved.</copyright>
<image>
<url>http://example.com/logo.png</url>
<title><?php bloginfo_rss('name'); wp_title_rss(); ?></title>
<link><?php bloginfo_rss('url') ?></link>
</image>
<title>・・・</title>
<atom:link href="<?php self_link(); ?>" rel="self" type="application/rss+xml" />
・
・
・
</channel>↑目次へ
③記事サムネイル表記
<item>要素下に<media:thumbnail>〜</media:thumbnail>という要素を追記し、
中に記事を代表するサムネイル画像のURL(200×200px以上,400px以上推奨)を表記しましょう。
feed-rss2.php
<item>
		<title><?php the_title_rss() ?></title>
		<link><?php the_permalink_rss() ?></link>
		<comments><?php comments_link_feed(); ?></comments>
		<pubDate><?php echo mysql2date('D, d M Y H:i:s +0000', get_post_time('Y-m-d H:i:s', true), false); ?></pubDate>
		<dc:creator><![CDATA[<?php the_author() ?>]]></dc:creator>
		<?php the_category_rss('rss2') ?>
		<?php
		$image_id = get_post_thumbnail_id();
		$image_url = wp_get_attachment_image_src($image_id, true);
		?>
		<media:thumbnail><?php echo $image_url[0]; ?></media:thumbnail>
		・
		・
		・
</item>参考:Smart News配信用のRSSのサムネイルやロゴの出力方法 | あれもこれものLifelog
↑目次へ
フィードの確認(SmartFormat Validator)
これは完全にSmart News向けですが、フィードにエラーがないか『SmartFormat Validator』というページで確認できます。
使い方は簡単。
サイトのRSSのURLを入力するだけです。
参考までに、WordPressのRSSフィードのURL一覧をどうぞ。
WordPressのフィードURL一覧
http://example.com/?feed=rss
http://example.com/?feed=rss2
http://example.com/?feed=rdf
http://example.com/?feed=atomカスタム パーマリンク を使用しているならば、以下の方法でアクセスできるはずです。
http://example.com/feed/
http://example.com/feed/rss/
http://example.com/feed/rss2/
http://example.com/feed/rdf/
http://example.com/feed/atom/
参考:WordPress フィード配信 – WordPress Codex 日本語版
バリデーターでvalidが出ればOKです!ヾ(⌒(ノ’ω’)ノ
おつかれさまでした!!
↑目次へ
さいごに
というわけで、(限りなくSmart Newsのための)WordPressのRSSカスタマイズ方法でした!
閉じタグ忘れに気をつけながらカスタマイズしてくださいね(*´∨`*)b
以上、みぞれでした!
参考:SmartFormat
この記事がお役に立ったら
いいね!お願いしまっす
(*´∨`*)
この記事を書いたみぞれしはTwitterをやっています
Follow @xxmiz0rexx